Meteon Garage is Meteon Run's official web dashboard — the place where you buy NFT sneakers, move GMTO in and out of the game, lend sneakers through the scholarship program, and stake MTO. You'll find it at market.meteornrun.io. Log in with the same account you use in the game app and a wallet on the Polygon chain — the "Garage Wallet" — is generated for you automatically. According to the official whitepaper, there's no seed phrase (recovery words) to manage and no browser extension to install: you recover access through your social login (Google / Apple).
This guide walks through every menu using real screenshots (English UI, captured August 2026, personal details masked). Every figure on those screens — prices, APY, gas fees and so on — is an example as displayed in August 2026 and will change with market rates and future updates. Always confirm the latest details in Garage itself and on the official website.
- What is Meteon Garage? (what you can do)
- Logging in and initial setup
- Wallets: using your Garage Wallet
- Buy NFT: how to buy an NFT sneaker
- My NFT: checking the NFTs you own
- Scholarship: lend and earn in 7 steps
- Staking V2: staking MTO
- Send GMTO (deposits & withdrawals) — see the separate guide
- Common problems and things to watch
- FAQ
What Is Meteon Garage? (What You Can Do)
Once you're logged in, the home screen shows cards for your PLAYER ID (with a "Connected" badge if it's linked to the game), YOUR ACTIVATION CODE and your email address, followed by "News & Updates" and shortcuts to the six main features. You move between features using the menu in the top-left corner (on desktop it stays open on the left).
- Buy NFT: the official NFT sneaker shop (including Packages)
- Send GMTO: in-game GMTO ⇄ Garage Wallet (deposits and withdrawals)
- Scholarship: lend your NFT sneakers and share the GMTO they earn
- Staking V2: stake MTO and receive GMTO
- My NFT: see the NFTs you own (In Wallet / Ingame)
- Wallets: balances, sending tokens, connecting external wallets
Logging In and Initial Setup (Activation Code, Profile)
The single most important thing: log in with the same account you use in the game app. Use a different account and your wallet, NFTs and profile won't sync with the game.
Log in with the same account as the game app
Open market.meteornrun.io and sign in with the same account you use in the app (email / Google / Apple). Your Garage Wallet is generated automatically the first time. Bookmark the genuine URL, and never enter through ads or unofficial links.
Check your PLAYER ID and the "Connected" badge
If your account is linked to the game, "Connected" appears next to your PLAYER ID. "YOUR ACTIVATION CODE" shows your own code, which you can copy with the Copy button (Garage itself doesn't explain what it's for, so check the in-app guidance or official information).
Set up your profile and language
Tap your email address in the top-right corner to open "View profile / Your Asset / Manage Wallet / Log out." View profile lets you change your avatar, Fullname and Email, and switch the Language (English / Tiếng Việt / Japanese). Pick a language and hit SAVE. Further down you'll also see "Activation code has been applied."
Turn on two-factor authentication for your login account
Your social login is the "key" to your Garage Wallet. The whitepaper also recommends enabling 2FA on your Google / Apple account and never sharing your credentials.
Wallets: Reading and Using Your Garage Wallet
The "Wallets" page shows, from the top, a network notice, Connected Wallets and Connect New Wallet (for adding an external wallet). This is where you first deposit the funds you'll use for NFT purchases and gas.
Connected Wallets: balances and wallet actions
- "Meteon Garage Wallet" (0x…, ACTIVE / ★PRIMARY, Chain ID 137) is registered by default
- Copy: copies your address. Paste it as the destination when withdrawing from an exchange
- TOKEN BALANCES: your MTO / GMTO / USDT / POL balances. If you see a syncing notice, tap "Update Balances"
- WALLET OPERATIONS: Send (transfer tokens) / Polygonscan (view your transaction history)
Send: sending tokens to an exchange or external wallet
In the "Send Token" dialog, choose the Token (GMTO / MTO / USDT / POL), enter the To Address (the recipient's 0x… address) and the Amount, then send. The dialog notes "You can send to an exchange or external wallet." Gas is expected to be paid in POL — the "How to Buy" guide says "POL is required for every transaction," and this dialog shows no option to pay gas in another token — so keep a POL balance on hand. Transfers can't be reversed, so send a small test amount first to any new address.
Connect New Wallet: adding MetaMask or another external wallet
Tap "Connect Wallet," choose MetaMask / Trust Wallet / SafePal / Binance Wallet or another (use Search Wallet for the rest), and sign a message to prove ownership. The connection is made on Polygon Mainnet (Chain ID 137). An external wallet is not required — the Garage Wallet alone covers everything from buying to withdrawing.
Buy NFT: How to Buy an NFT Sneaker (the 5-Step "How to Buy")
"Buy NFT" is the official NFT sneaker shop. At the top you'll find Minted (the number issued so far), FLOOR PRICE (the lowest price, in MTO), a "How to Buy" button, the Shoes / Packages toggle and category tabs (Standard / Trial / Running / Heel and more). Each card shows the rarity, BONUS GIFT (FREE PLAY ×n), PRICE (USDT), MAX GAIN (GMTO) and PER REPAIR (GMTO). The on-screen definition of MAX GAIN is cut off ("MAX GAIN is the max earned during…"), so we don't interpret it — treat it as a reference figure, not a guarantee of future earnings, and check the official guidance before buying.
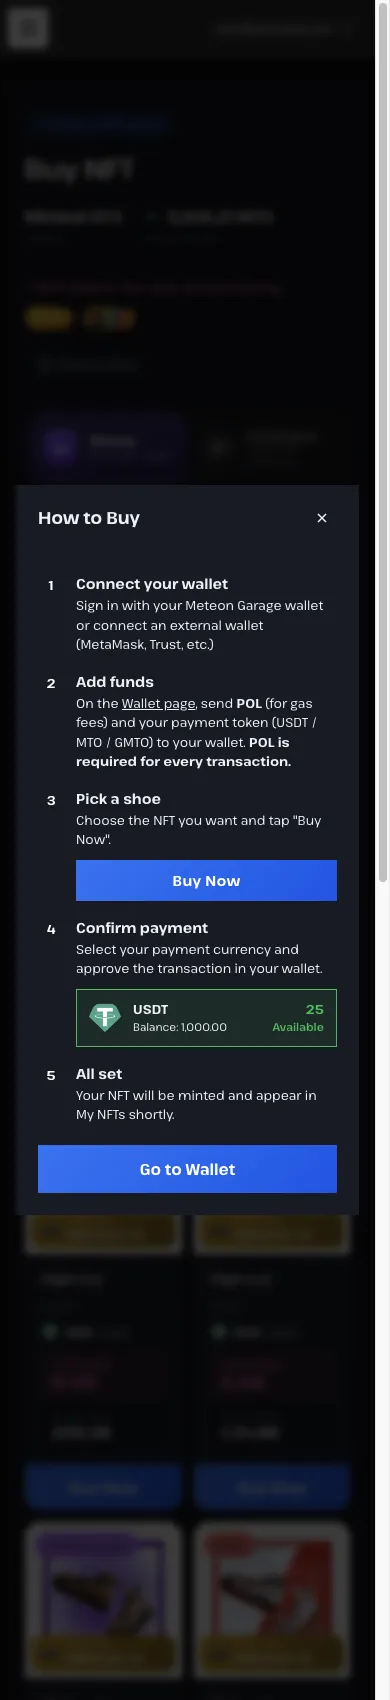
Here are the five "How to Buy" steps:
Connect your wallet
Sign in with your Garage Wallet or connect an external wallet (MetaMask, Trust, etc.). If you're already logged in, this step is done.
Add funds
On the Wallet page, send POL for gas plus your payment token (USDT / MTO / GMTO) to your wallet. As the note says, "POL is required for every transaction" — you need POL on top of whatever currency you pay with.
Pick a shoe
Tap "Buy Now" on the NFT you want. Sold-out items show "Sold Out."
Confirm payment
Choose a currency in "Select Payment" (USDT / GMTO / MTO / POL) and approve in your wallet. Currencies you don't hold enough of are marked "Insufficient," and you can't proceed until the balance covers the price.
All set
Your NFT is minted (issued) and appears in "My NFT" shortly.
A rough idea of prices, and Trial sneakers
Prices are set in USDT. In the Standard category, the most affordable COMMON starts in the tens of USDT, and prices rise with rarity (examples as displayed in August 2026). If you pay in GMTO, MTO or POL, the amount is converted at the rate at that moment.
The Trial category offers Trial Common / Uncommon / Rare sneakers for just a few USDT — an easy way to get started — but as the note says, "Trial shoes are for your own gameplay only — they cannot be lent out via Scholarship." In other words, they can't be lent through the scholarship program. Also note that sneakers bought through in-app purchase are not NFTs and won't appear in My NFT (see the next section).
Packages (Investor Packages): bulk-buy discounts
The Packages tab (Scholarship Investor Packages) sells bundles of 5, 10 or more NFTs of the same rarity at a discount of a few percent (3–7% OFF in the examples displayed in August 2026). A Package NFT is delivered to your wallet and the sneaker NFTs inside are minted to you automatically. These are designed for people who plan to lend several pairs through the scholarship program, so for your first pair the Shoes tab is all you need.
My NFT: Checking the NFTs You Own
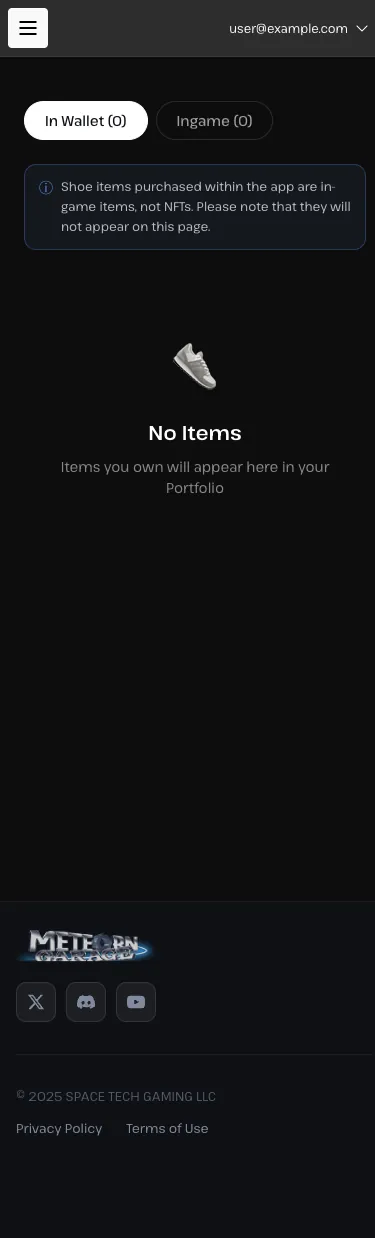
"My NFT" lists the NFT sneakers you own, in two tabs: In Wallet (held in your Garage Wallet) and Ingame (NFTs you've moved into the game). According to the whitepaper, a purchased NFT first appears automatically in My NFT; the "ingame" action then pushes it into the app's "My box," where you can equip it. If you want to lend an NFT through the scholarship program, one that's "In game" must be unlocked first.
Scholarship: Lend Your NFT Sneakers and Earn (the Owner's 7 Steps)
Scholarship lets an NFT sneaker owner lend a sneaker to a scholar (borrower); the scholar runs, and the GMTO they earn is split at an agreed ratio. Ownership never changes hands, and scholars join with no upfront cost. The top of the Dashboard shows market-wide stats (Active Scholarships / New Scholarships / Owner Rewards, reset daily at 16:00 UTC), followed by your own cards such as NET PROFIT (Earnings − repair costs used). The 🔔 in the Dashboard header opens your notifications list.
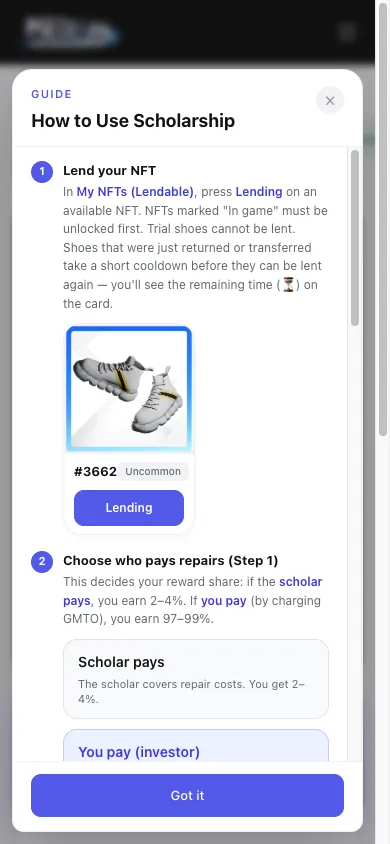
Here's the gist of the owner's seven steps, as shown under "How to Use" in the top-right corner.
Lend your NFT
On the "My NFTs (Lendable)" tab, tap "Lending." NFTs marked "In game" must be unlocked first, and Trial sneakers can't be lent. Right after a return or transfer there's a cooldown, with the time remaining (⏳) shown on the card.
Choose who pays repairs
With Scholar pays, the owner's share is 2–4%; with You pay (investor) — the owner charges GMTO to cover repairs — the owner's share is 97–99%.
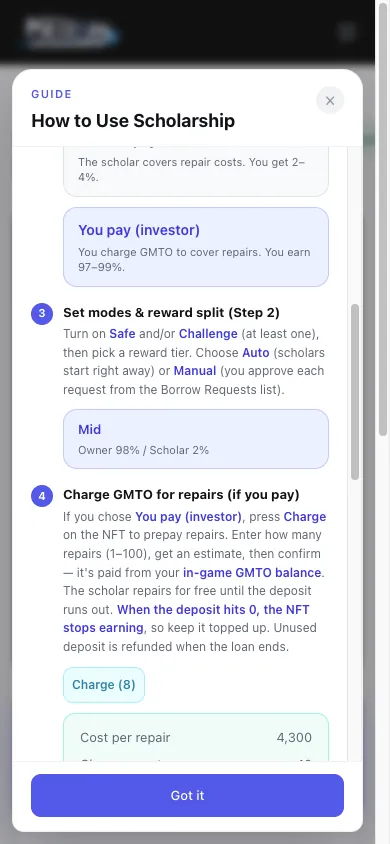
Set modes & reward split
Turn on at least one of Safe / Challenge and choose a reward tier (e.g. Mid = Owner 98% / Scholar 2%). This is also where you pick Auto (scholars start immediately) or Manual (you approve each request from Borrow Requests).
Charge GMTO for repairs (if you pay)
Tap "Charge," enter a number of repairs (1–100), review the estimate and confirm. Payment comes from your in-game GMTO balance. Once the deposit hits 0 the NFT stops earning, so top it up. Any unused amount is refunded when the loan ends.
Monitor scholars (Activity tab)
Tap a lent NFT to see the scholar's Skill / Effort / Margin rated 1–5 ★ over a 7- or 14-day window. The Status tab shows durability, the repair deposit and the loan period.
Check your earnings (Rewards tab)
Gross output and Your share, per NFT. The Net Profit at the top is "earnings − repair costs used."
Recall your NFT
Tap "Schedule recall" under On Loan and the NFT is returned automatically after 24 hours (the scholar can keep playing in the meantime). You can cancel before it completes, and any unused repair deposit is refunded to your in-game GMTO.
The dashboard's five tabs
- On Loan: NFTs currently lent out. Recalls start here too
- My NFTs (Lendable): NFTs you can lend (All / Lending / Available). Trial sneakers aren't shown
- Requests: borrow requests when you're on Manual. Approving one candidate auto-declines the others
- Activity: how your lent NFTs are being used (tap a row for details)
- Rewards: rewards per lent NFT
Staking V2: Stake MTO and Receive GMTO
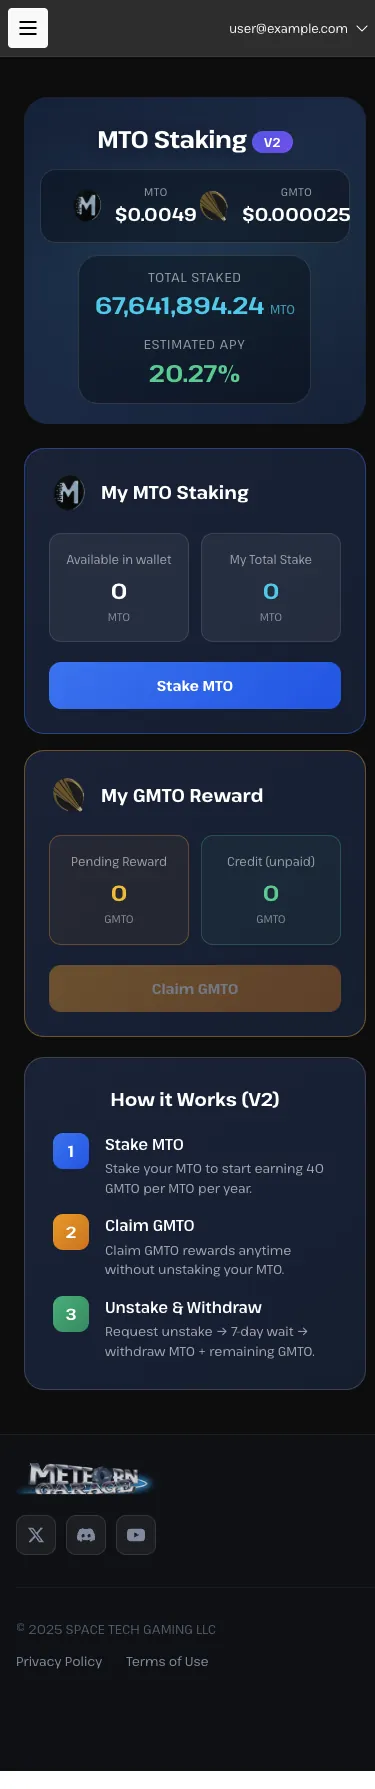
"Staking V2" lets you lock (stake) MTO and receive GMTO as the reward. At the top are reference rates for MTO / GMTO, TOTAL STAKED and ESTIMATED APY; below them sit "My MTO Staking" (Stake MTO) and "My GMTO Reward" (Pending Reward / Claim GMTO).
Stake MTO
Enter an amount (Max for everything) and choose the currency for gas from GMTO / MTO / POL (POL was the default at the time of capture). The original text reads "Stake your MTO to start earning 40 GMTO per MTO per year."
Claim GMTO
Collect your accumulated GMTO at any time, without unstaking your MTO.
Unstake & Withdraw
After a 7-day wait from your request, withdraw your MTO plus any remaining GMTO.
The legacy "Staking" page (V1) shows "New staking is available on V2 only." — new stakes go through V2 only. V1 follows a "request → 7-day lock → receive" flow and exists to manage past stakes. The APY is a reference figure that changes daily with both tokens' prices and is no promise of future yield.
Send GMTO (Deposits & Withdrawals) — See the Separate Guide
"Send GMTO" is the menu for moving GMTO between your in-game GMTO balance and your Garage Wallet. It works in two directions — Send to Game (wallet → game; credited in 2–5 minutes, gas payable in GMTO / MTO / POL) and Send to Wallet (game → wallet; 0.5% fee, daily and monthly caps, a minimum withdrawal of roughly $10 worth of GMTO, destination fixed to your Primary Wallet and not cancellable) — with a History list at the bottom (as displayed in August 2026).
For the exact deposit and withdrawal steps, how to read the fees and caps, and the route all the way to an exchange, see the deposit & withdrawal guide, with screenshots. For what to do with your GMTO and how to think about the economics, the earning guide is worth a read too.